Disclaimer: The following instructions assume that you have a basic understanding of Azure Data Factory and data engineering concepts. If you are new to Azure Data Factory or data integration processes, it is recommended to familiarize yourself with the tool’s capabilities and underlying concepts before proceeding. Here are some links that could help you in getting started. Azure Data Factory Documenation Snowflake – Getting Started Microsoft Copy and Transform data in Snowflake Document
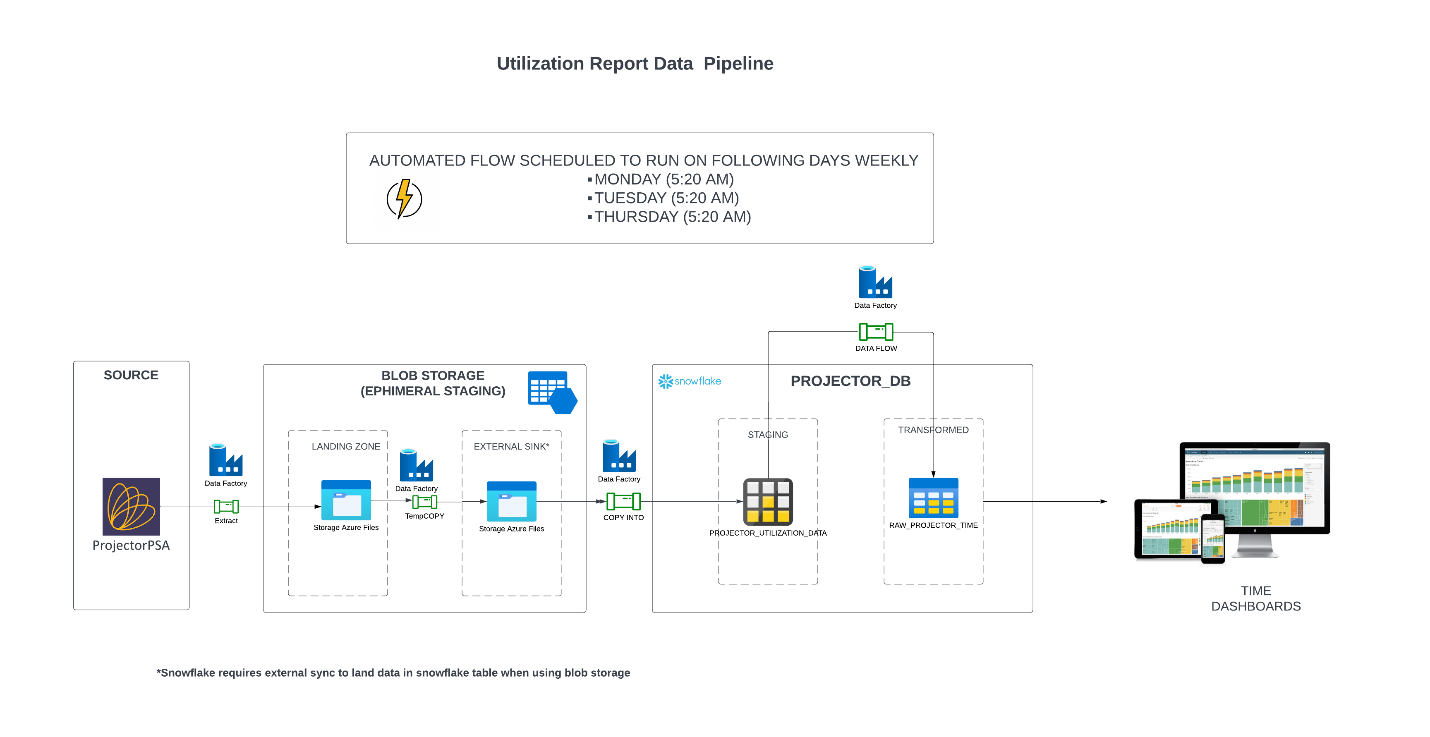
Azure Data Factory (ADF) is a powerful ETL (Extract, Transform, Load) tool widely used for data integration. It is particularly beneficial for businesses already utilizing the Microsoft ecosystem and organizations familiar with Azure Data Factory. In this blog post, we will demonstrate how to use Azure Data Factory to extract data from a source system, stage it in Azure Blob Storage, and load and transform the data into Snowflake Data Cloud.
Key Concepts:
Let’s familiarize ourselves with some key ideas and tools used in this data pipeline.
- Azure Data Factory (ADF): ADF serves as the primary tool in this blog post for creating an ETL process. It allows you to call REST APIs to retrieve data from your application source, which can then be stored in a destination of your choice. In our case, we will use Snowflake as the destination, but you can adapt the process to work with your preferred data source.
- Azure Blob Storage: Azure Blob Storage provides scalable storage capabilities and efficient data access. In the context of this blog post, we will connect Azure Blob Storage as staging store. The Copy Activity within your Azure Data Factory Pipeline will handle the data flow from staging to the source seamlessly.
- Azure Linked Service: Linked Service in Azure Data Factory is a configuration entity that connects Azure Data Factory with an external data store or service. It includes connection details and credentials for accessing the data source. Linked Services enable data integration and movement within Azure Data Factory.
For example, by providing the necessary connection information, such as the Azure subscription, storage account name, and access key, you can authenticate and authorize access to Blob Storage. This Linked Service is then used in activities like Copy Data to read from or write data to Azure Blob Storage within Azure Data Factory. - SAS URL (Shared Access Signature URL):
A SAS URL is a type of URL that grants limited access to specific resources in a Microsoft Azure storage account. It is commonly used to provide temporary and restricted access to Azure Storage resources such as blobs, files, queues, or tables.
Prerequisites:
Before configuring Azure Data Factory for data copy operations, it’s important to have a few prerequisites in place. Here are the key requirements:
- Azure Subscription: You need an active Azure subscription to create and manage Azure Data Factory resources. If you don’t have one, you can create a free Azure account at https://azure.microsoft.com/free/.
- Azure Data Factory: Ensure that you have provisioned an instance of Azure Data Factory in your Azure subscription. If you haven’t set up an Azure Data Factory, you can create one through the Azure portal or by using Azure PowerShell, Azure CLI, or Azure Resource Manager templates. Azure Data Factory Documenation
- Source and Destination Data Stores: Identify the source and destination data stores from where you want to copy the data. Azure Data Factory supports a wide range of data sources. This scenario we are sourcing an application data to blob storage and ingest data in Snowflake cloud data warehouse. Make sure you have the required access privileges in Snowflake to create tables, read data, update data, and delete data. This will allow you to interact with Snowflake as the destination for your transformed data.
- Connection Strings and Credentials: Obtain the necessary connection strings and credentials for both the source and destination data stores. Ensure that you have connection information, such as the Azure subscription, storage account name, and access key, and you can authenticate and authorize access to Blob Storage and able to create Azure Linked Services. In our scenario we use Shared Access Signature (SAS) Authentication to authorize the data transfer process by creating linked service.
- Permissions and Access Control: Make sure you have the necessary permissions to create and manage resources within Azure Data Factory. You may need appropriate roles, such as Contributor or Owner, assigned to your Azure subscription or resource group.
Once we these prerequisites fulfilled, we can configure Azure Data Factory ETL work.
Developing the ETL Process:
Let’s walk through the detailed steps involved in extracting data from a source service using REST APIs, staging it in Azure Blob Storage, copying it to Snowflake tables, and performing transformations. The Microsoft Copy and Transform data in Snowflake Document provides a comprehensive list of all constraints related to Direct Copy to Snowflake.
Below is the data flow architecture for Snowflake ETL integration created for this work.
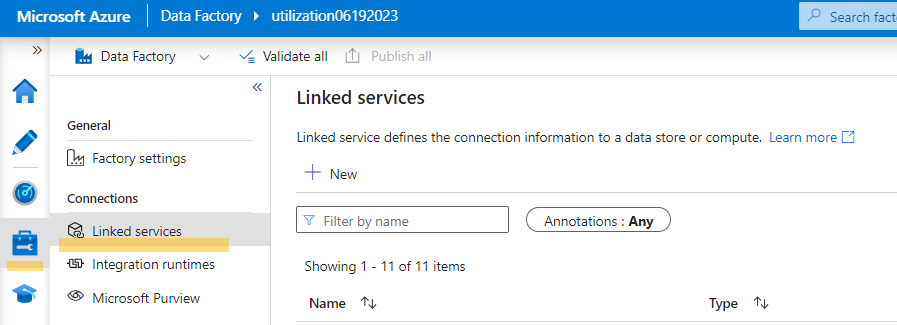
Step 1: Create Linked Services
Source (REST API):
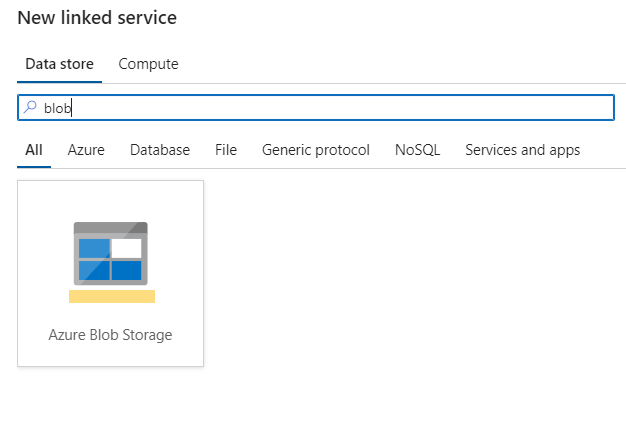
- Launch Azure Data Factory Data Studio and select “Linked Services” from the connection pane under the “Manage” tab.
- Create a new REST linked service and provide the necessary details for connecting to the source system’s REST API.
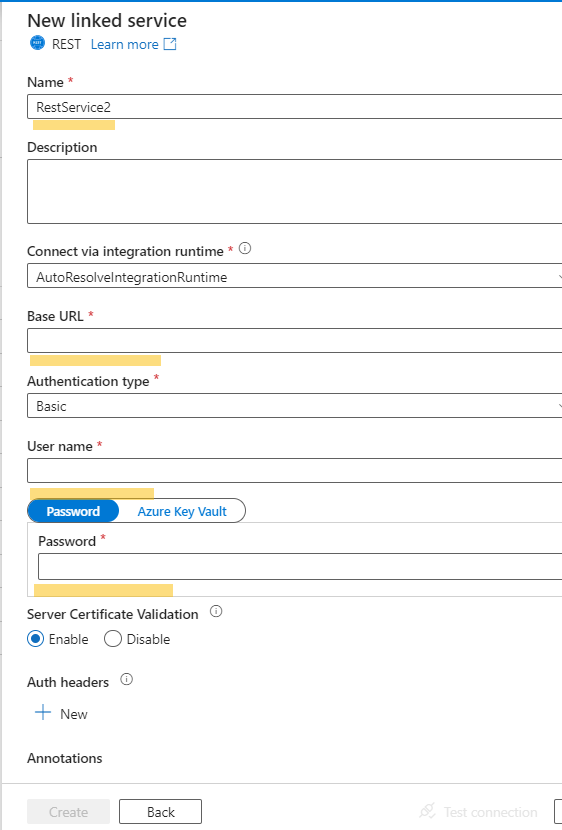
- Test and save the connection.
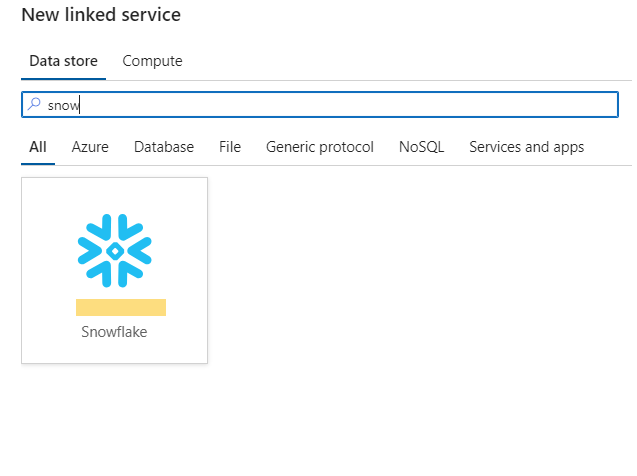
Destination (Snowflake):
- Create a linked service for Snowflake in Azure Data Factory.
- Set up your Snowflake environment and add the Snowflake credentials to the linked service configuration.
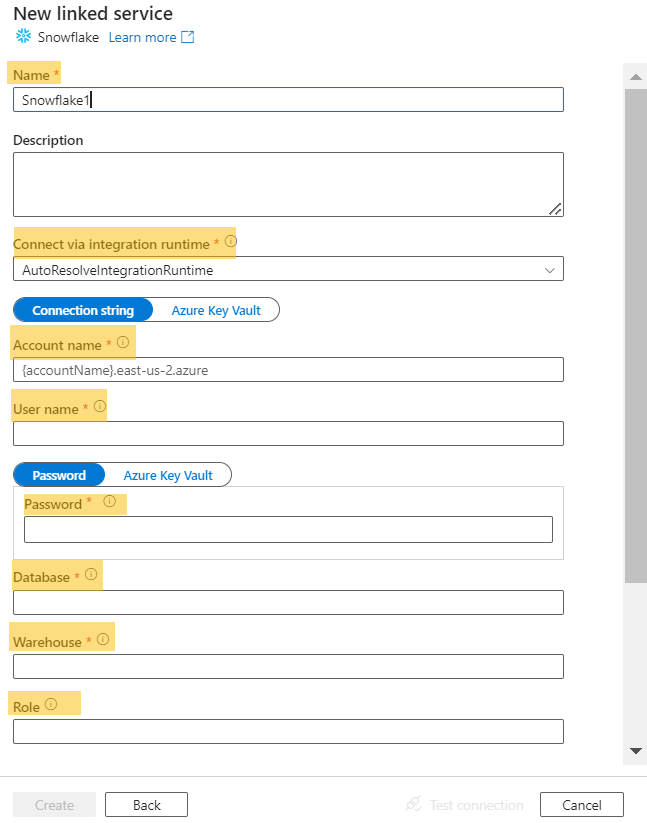
- Retrieve the necessary information (Account Name, User Credential, Database, Warehouse, and Role) from Snowflake.
- Test and create the connection.
Staging Sync:
- Linked Service for Transient Storage:
- Create a linked service for the Azure Blob container that will serve as the transient staging area.
- Connect to the blob using the SAS URI.
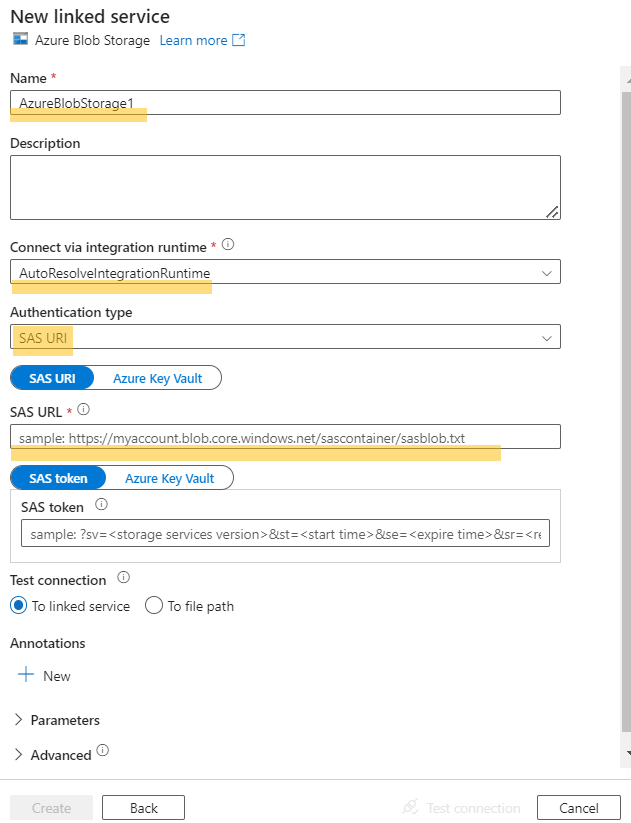
- Copy the SAS signature from the storage container and include it in the linked service configuration.
- Test and create the linked service.
- Create a linked service for the Azure Blob container that will serve as the transient staging area.
- Linked Service for External Sync to Snowflake:
- Repeat the process mentioned above to create an external staging linked service for Snowflake. This staging area will enable direct copying of data from the Azure Blob storage to Snowflake tables using the COPY_INTO command.
Step 2: Build Your Data Pipeline
In this step, we will construct the data pipeline using Azure Data Factory. The pipeline will involve copying data from the source to Azure Blob Storage, converting the data from JSON to CSV format, staging it in Snowflake tables, and performing transformations.
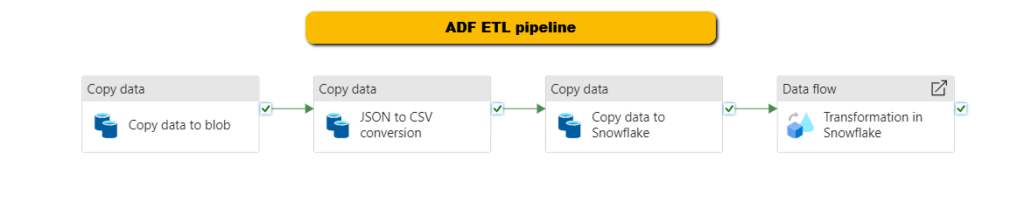
Copy Data to Blob:
-
- Drag and drop the “Copy Data” activity from the Activities pane onto the pipeline canvas.
- Provide a name for the pipeline and the copy activity.
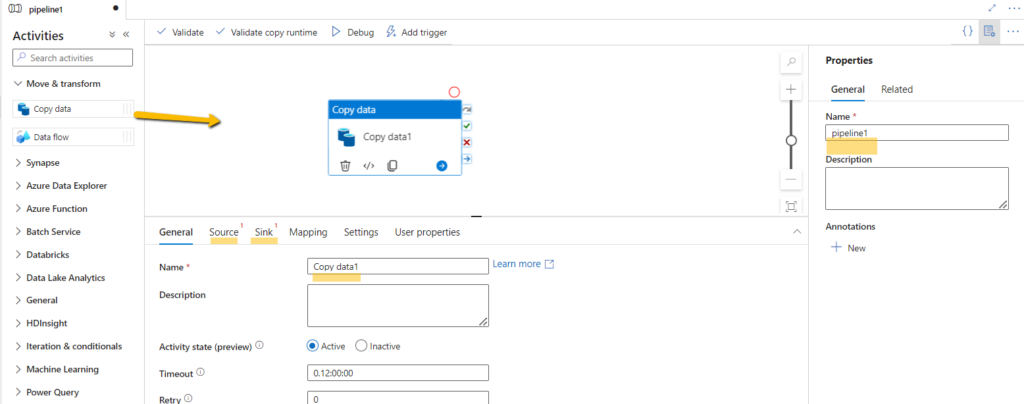
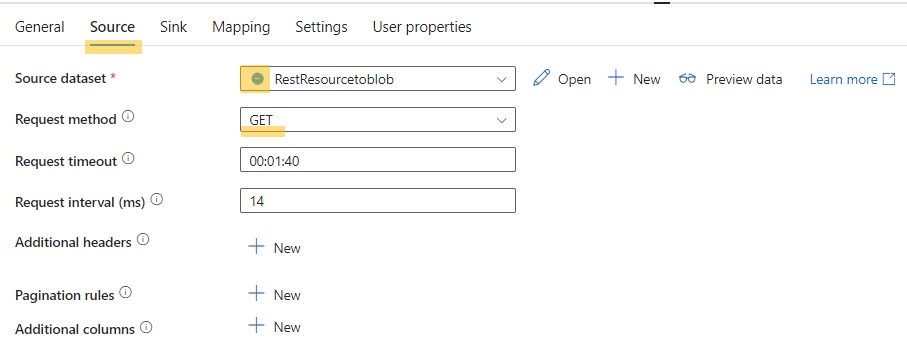
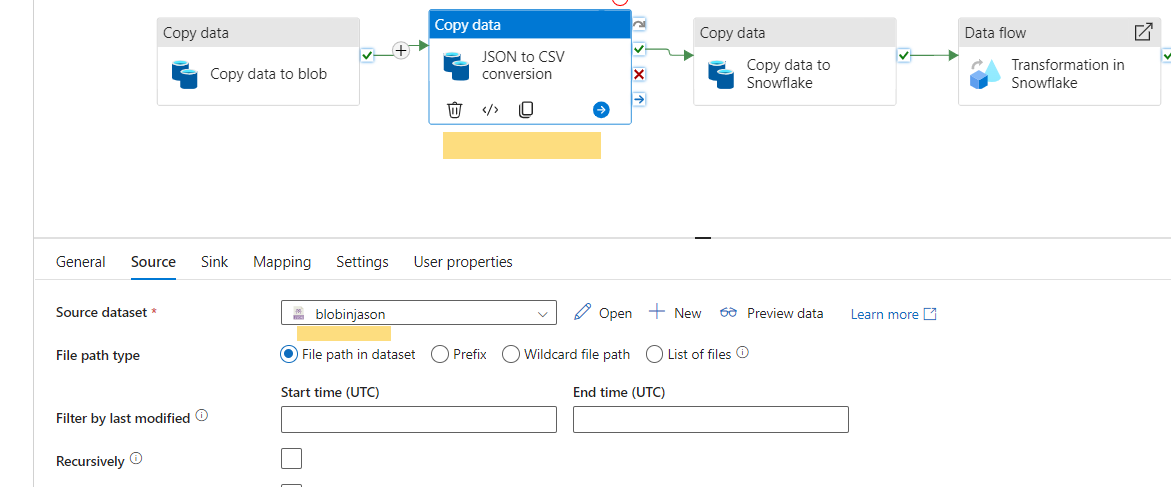
- Configure the source tab to select the source dataset, which corresponds to the REST linked service you created earlier.
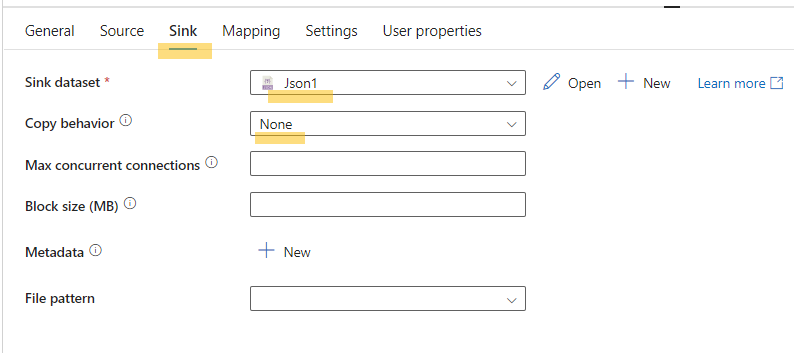
- Configure the sink tab to create a sink dataset in JSON format for landing the source data.
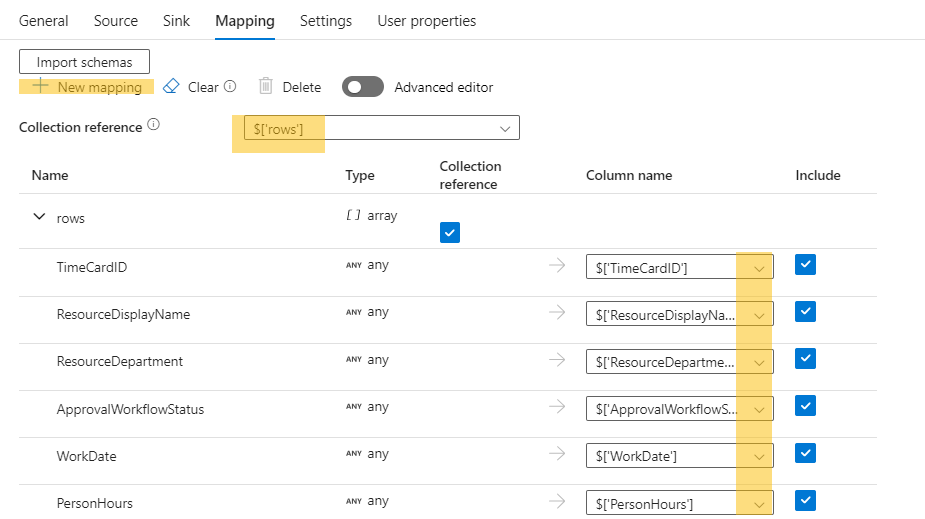
- Load the schema and ensure the mapping is correct.
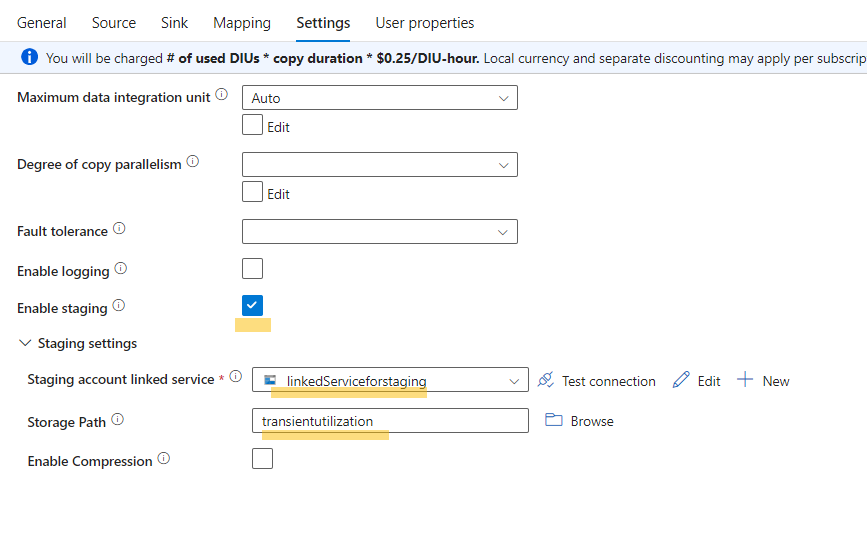
- In the settings, enable staging and connect to the linked service you created for the Azure Blob container.
- Define the storage path for the staged data.
- Once the source and sink are set up, you can run or use the debug mode to test the pipeline.
Convert File Type to CSV:
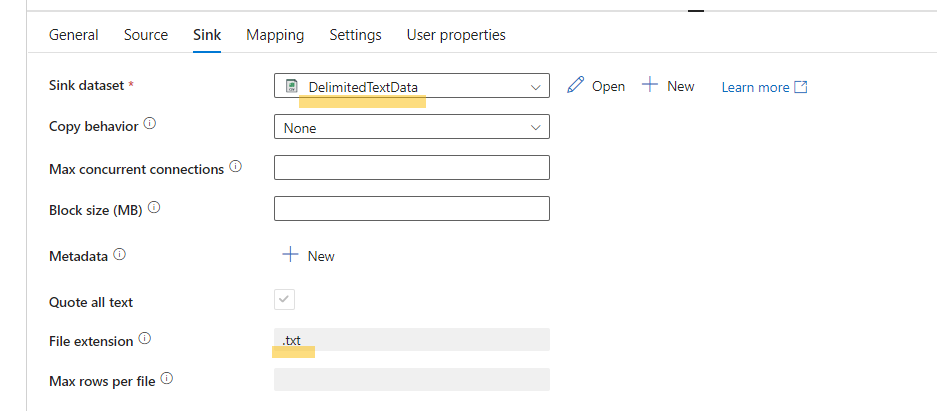
- Link the sink dataset with a text file linked service to convert the JSON file and save it as a text file.
- Use the same “Copy Data” activity to convert the JSON file to a CSV file.
- Configure the source as the JSON file and the sink as the CSV file, both located in the Azure Blob Storage containers.
Copy Data to Snowflake Database:
- Create a source dataset that points to the Azure Blob Storage container where the converted CSV or text file is located.
- Create a sink dataset using the Snowflake linked service you created earlier.
- Import the schema and map the fields between the source and sink datasets.
- In the settings, enable staging and add the linked service for transient staging (Azure Blob container).
- When auto-generating the user properties, ensure that the source and sink files are populated correctly.
Transform Data In Snowflake:
Now that we have staged data in snowflake we need to clean up and do light transformation for making data report ready. We are using ADF to run transformation within Snowflake. This is a simple transformation where we do type conversion for data and store it in a new table.
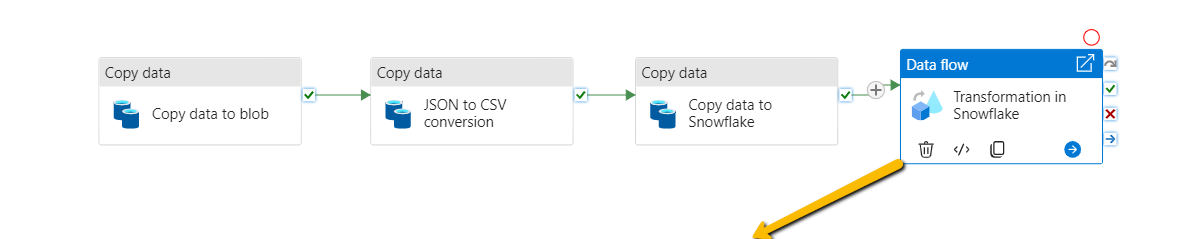

Fig. Activities inside the ‘Transformation in Snowflake’ Card.
Source
- Add the landing table in snowflake as the source
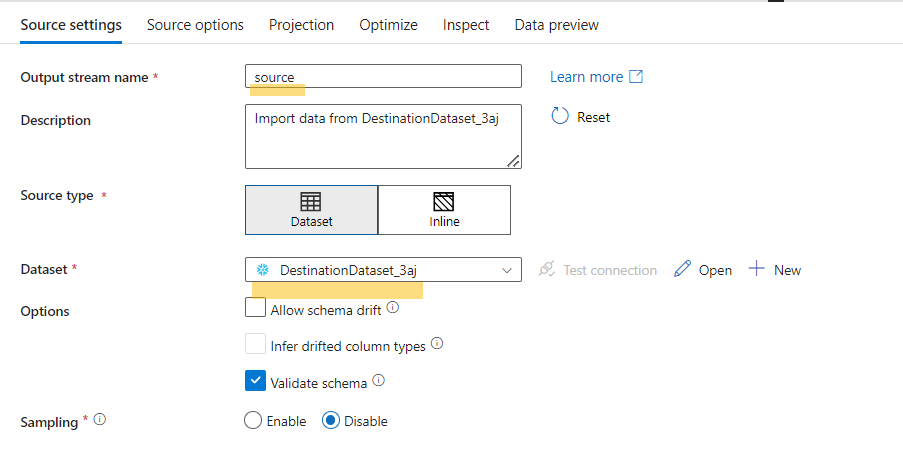
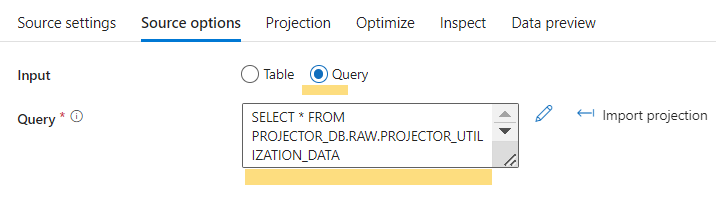
- Select Source option you prefer to use. Here we have used SQL query.
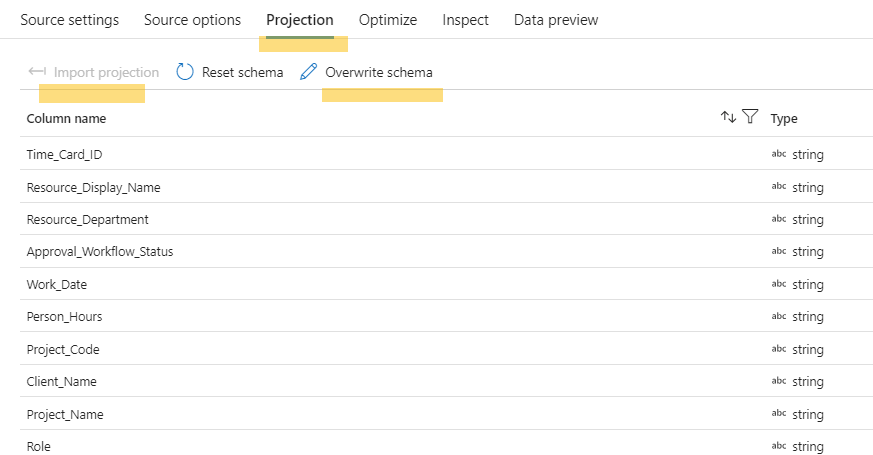
- You can also import projection by running the cluster on debug mode or manually add field
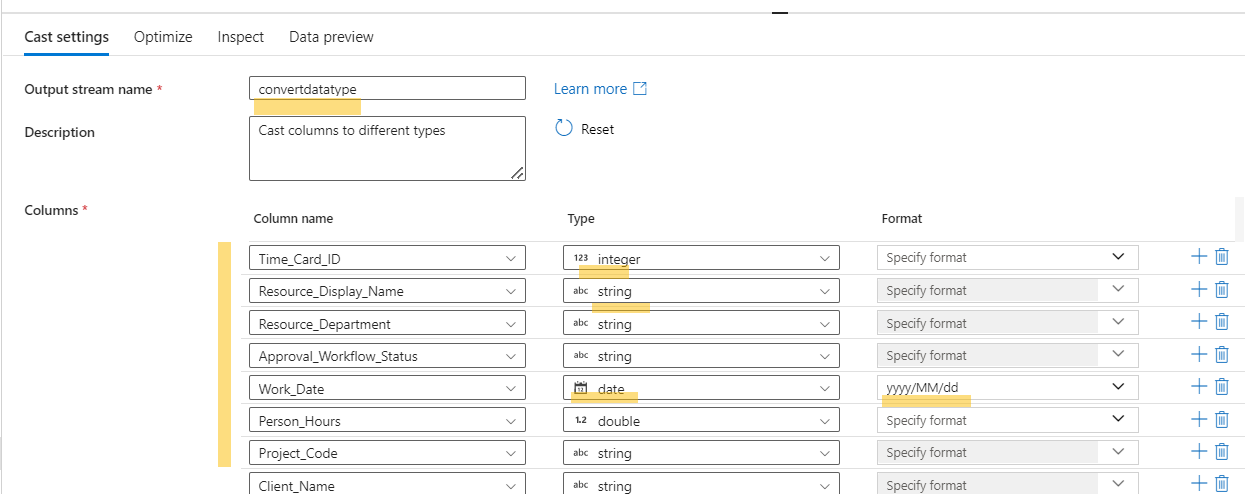
Convert Data Type
- Perform data type conversions for the fields that require it to ensure appropriate data types (e.g., date, integer, float) for better reporting features.
Destination
- Create a data set link to table in snowflake
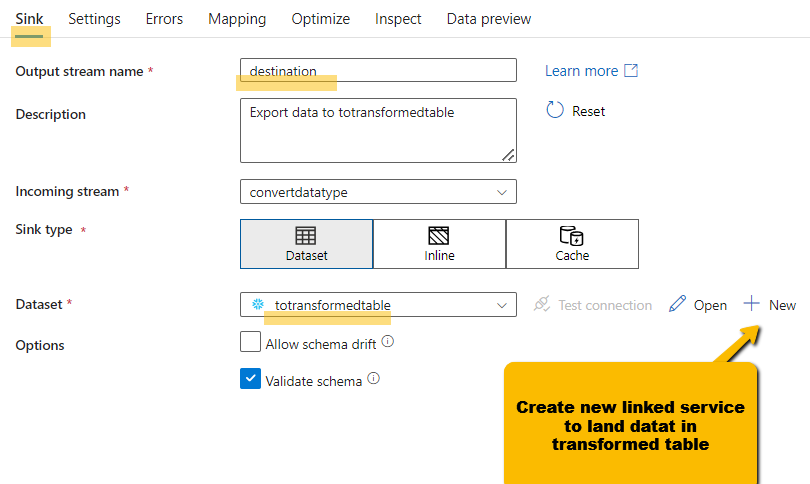
- Sink just created destination dataset by selecting from the list
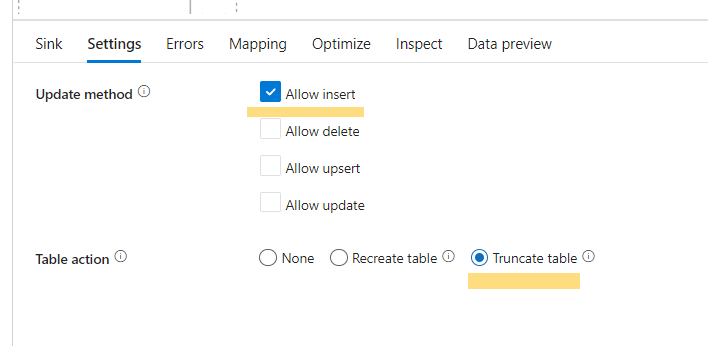
- In settings chose the update method and table action
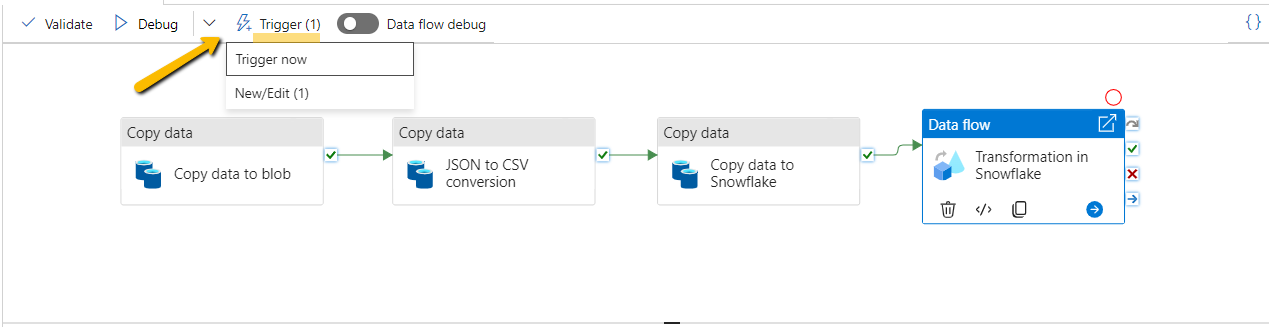
Step 3: Schedule Data Pipeline
To automate the data pipeline and ensure regular data updates, you can schedule it to run at specific intervals using triggers in Azure Data Factory. This allows you to define the frequency of data transfers and keep your reports up to date.
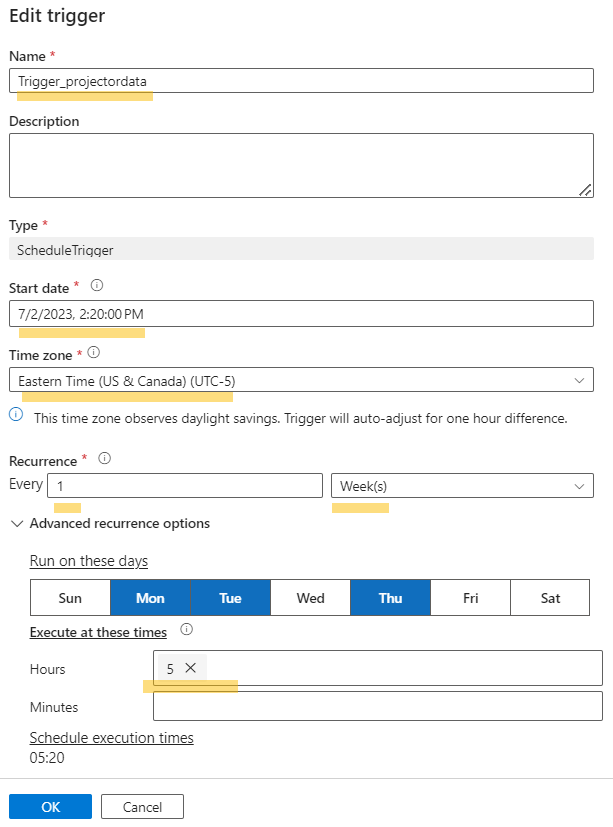
- Select new/edit trigger
- Add schedule as is needed. Here is a one I have for this pipeline
Conclusion
Azure Data Factory provides a robust solution for data integration and ETL processes. By leveraging Azure Blob Storage and Snowflake Data Cloud, you can efficiently engineer and manage data for analytical need. The detailed steps provided in this blog post guide you through configuring your ETL pipeline, establishing the necessary connections, and effectively mapping your data to Snowflake tables.
